Dental veneers are one of the most popular cosmetic dentistry solutions for achieving a flawless, natural-looking smile. These thin, custom-made shells are designed to cover the front surface of teeth, improving their shape, color, and alignment. People choose veneers for various reasons, including stained teeth, chipped enamel, minor gaps, or uneven tooth shape. In modern cosmetic dentistry, veneers offer a long-lasting and aesthetically pleasing solution that enhances both appearance and confidence.
For individuals considering advanced cosmetic treatments like Dental Veneers in Chandler, AZ, understanding the step-by-step process is essential. Knowing what to expect before, during, and after the procedure helps patients make informed decisions and feel more comfortable throughout their smile transformation journey.
Step 1: Initial Consultation and Oral Examination
The journey toward dental veneers begins with an initial consultation with a cosmetic dentist. During this appointment, the dentist evaluates your oral health, discusses your aesthetic goals, and determines whether you are a suitable candidate for veneers.
The dentist will examine your teeth for issues such as decay, gum disease, or enamel erosion. X-rays or digital scans may also be taken to get a complete understanding of your dental structure. This step ensures that any underlying dental problems are treated before proceeding with cosmetic enhancements.
Patients are encouraged to share their expectations regarding tooth shape, color, and overall smile appearance. This communication helps the dentist create a personalized treatment plan.
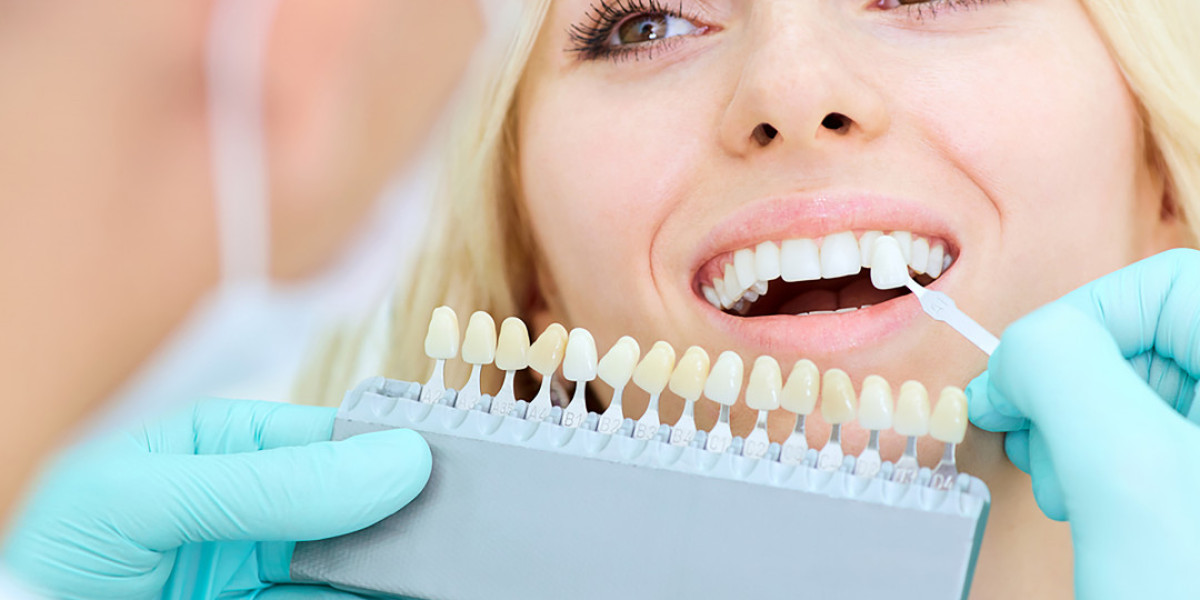
Step 2: Treatment Planning and Smile Design
Once the dentist confirms that veneers are suitable, a detailed treatment plan is created. This stage often involves digital smile design technology, which allows patients to preview their potential results before the actual procedure begins.
The dentist selects the appropriate veneer material, typically porcelain or composite resin, based on durability, aesthetics, and budget. Porcelain veneers are more stain-resistant and long-lasting, while composite veneers are more affordable and quicker to apply.
Color matching is also done during this stage to ensure that the veneers blend seamlessly with surrounding teeth for a natural appearance.
Step 3: Tooth Preparation
To prepare the teeth for veneers, a small amount of enamel—usually less than a millimeter—is gently removed from the front surface of the teeth. This step is crucial because it creates space for the veneer to fit naturally without appearing bulky.
Local anesthesia may be used to ensure patient comfort during the enamel removal process. The amount of preparation depends on the type of veneers and the patient’s dental condition.
After preparation, the teeth are cleaned thoroughly to ensure a smooth surface for bonding.
Step 4: Impressions and Digital Scanning
Once the teeth are prepared, the dentist takes precise impressions or digital scans of the teeth. These impressions serve as a blueprint for creating custom veneers that perfectly match the size, shape, and alignment of your natural teeth.
Advanced dental technology ensures that the impressions are highly accurate, reducing the chances of adjustments later. The data collected is then sent to a dental laboratory where skilled technicians craft the veneers.
This stage plays a significant role in ensuring that the final result looks natural and fits comfortably.
Step 5: Temporary Veneers Placement
While the permanent veneers are being fabricated, temporary veneers may be placed on the prepared teeth. These temporary restorations protect the teeth and allow patients to maintain normal appearance and function during the waiting period.
Temporary veneers also give patients an opportunity to experience how their new smile will feel and function. If any adjustments are needed in terms of shape or size, feedback can be shared with the dentist before the final veneers are made.
Step 6: Fabrication of Permanent Veneers
In the dental laboratory, technicians carefully craft each veneer using high-quality materials such as porcelain. The process involves layering ceramic material to mimic the natural translucency and texture of real teeth.
This stage requires precision and artistry to ensure that the veneers match the patient’s facial features and smile design plan. Depending on the complexity, this process may take one to two weeks.
Each veneer is custom-built to fit a specific tooth, ensuring perfect alignment and aesthetics.
Step 7: Fitting and Adjustments
Once the permanent veneers are ready, the patient returns to the dental clinic for fitting. The dentist places each veneer on the teeth to check for proper fit, color accuracy, and bite alignment.
Minor adjustments may be made to ensure comfort and symmetry. This step is crucial because even slight imperfections can affect the final result.
Patients are encouraged to provide feedback before the veneers are permanently bonded.
Step 8: Bonding the Veneers
After final approval, the veneers are permanently bonded to the teeth. The dentist cleans, polishes, and etches the tooth surface to enhance adhesion.
A special dental adhesive is applied, and each veneer is carefully positioned. A curing light is then used to harden the adhesive, securely attaching the veneer to the tooth surface.
Once bonded, any excess material is removed, and final polishing is done to achieve a smooth, natural finish.
Step 9: Post-Procedure Care and Recovery
After the procedure, patients may experience mild sensitivity to hot and cold temperatures, which usually subsides within a few days. It is important to follow proper oral hygiene practices, including regular brushing, flossing, and dental check-ups.
Dentists may recommend avoiding hard foods, biting nails, or using teeth as tools to prevent damage to veneers. With proper care, veneers can last 10 to 15 years or even longer.
Regular dental visits help ensure that the veneers remain in excellent condition and that overall oral health is maintained.
Step 10: Long-Term Maintenance
Maintaining veneers involves consistent oral hygiene and lifestyle habits. Avoiding excessive consumption of stain-causing foods and beverages such as coffee, tea, and red wine can help preserve their brightness.
Using a non-abrasive toothpaste and a soft-bristled toothbrush is recommended. Patients who grind their teeth may also be advised to wear a night guard to protect their veneers from wear and tear.
Good maintenance ensures longevity and keeps the smile looking natural and attractive for years.
Conclusion
The process of getting dental veneers is a carefully planned and highly precise procedure that transforms smiles while maintaining natural aesthetics. From consultation to final bonding, each step plays a vital role in achieving a beautiful and lasting result. Understanding the process helps patients feel more confident and prepared for their cosmetic journey. With proper care and expert dental guidance, veneers can significantly enhance both appearance and self-esteem, offering a long-term solution for a radiant smile.